Vision API OCR事始め(3):textAnnotations
『Vision API OCR事始め(2):検出されたテキストの階層構造(fullTextAnnotation)』に続いて、今回はもう一つのOCRレスポンスデータ表現(textAnnotations)を見ていきます。
【目次】
[1]textAnnotationsとは
Google Vision APIの機能リスト(https://cloud.google.com/vision/docs/features-list?hl=ja)によると、OCR(テキスト検出とドキュメントテキスト検出)機能のレスポンスには、2種類のデータ構造(表現)があるようです。
- fullTextAnnotation
- OCR で検出されたテキスト(fullTextAnnotation)の構造的階層
- (TextAnnotation -> Page -> Block -> Paragraph -> Word -> Symbol)
- textAnnotations
- テキストであると識別された単語、境界ボックス、textAnnotations のリスト
fullTextAnnotationについては、記事『Vision API OCR事始め(2):検出されたテキストの階層構造(fullTextAnnotation)』を参照してください。
本記事では、もう一つのtextAnnotationsについて見ていきます。
ところで、公式ドキュメントの表現「テキストであると識別された単語、境界ボックス、textAnnotations のリスト」は、なかなか解釈が難しいので、以下では実験を通して具体的にどのようなデータなのかを見ていきたいと思います。
なお、textAnnotationsは、RPCやPythonライブラリでは、キャメルケースではなくスネークケースでtext_annotationsとなります。
(補足)
本記事ではサンプルコードや説明をPythonクライアントライブラリを利用して書いていますが、OCRの抽出結果はプログラミング言語に依存しません。
APIの仕様やPythonクライアントライブラリの利用方法、レスポンスデータの関係については、以下の記事を参照してください。
また、本記事ではPythonクライアントライブラリ v2.0.0リリースに対応したコードで書いています。v1.0.0とv2.0.0の違いについては、『Vision API Pythonクライアントライブラリ v2.0.0リリース(BREAKING CHANGES 有り)』を参照してください。
[2]textAnnotationsが得られる条件
Google Vision APIの機能リスト(https://cloud.google.com/vision/docs/features-list?hl=ja)にある「テキスト検出」と「ドキュメント テキスト検出(高密度テキスト / 手書き)」の「レスポンス」の説明を読むと、textAnnotationsが得られるのは、「テキスト検出」だけのように読めますが、そうではないようです。
Vision APIの4つのメソッド(BatchAnnotateImages、BatchAnnotateFiles、AsyncBatchAnnotateImages、AsyncBatchAnnotateFiles)と、OCRの機能(特徴)タイプ(TEXT_DETECTION、DOCUMENT_TEXT_DETECTION)の組み合わせに対して、レスポンスのfullTextAnnotationとtextAnnotationsフィールドの設定状況を試してみたところ、以下のような動作ではないかと思います。
- JPEGなどの画像(BatchAnnotateImages、AsyncBatchAnnotateImages)に対しては、TEXT_DETECTION、DOCUMENT_TEXT_DETECTIONのどちらを利用しても、fullTextAnnotationとtextAnnotationsの両方が設定されるようです。
- PDFファイルなど(BatchAnnotateFiles、AsyncBatchAnnotateFiles)に対しては、fullTextAnnotationは設定されますが、textAnnotationsは設定されないようです。
つまり、textAnnotationsはJPEG画像などに対してのみ有効なフィールドのようです。(PDFファイルなどでは利用できないフィールドのようです。)
また、textAnnotationsが得られる時は、fullTextAnnotationも同時に得られます。
なお、Pythonクライアントライブラリの、text_detection、document_text_detectionメソッドは、BatchAnnotateImagesメソッドのラッパーなので、textAnnotationsも得られます。
[3]textAnnotationsの構造
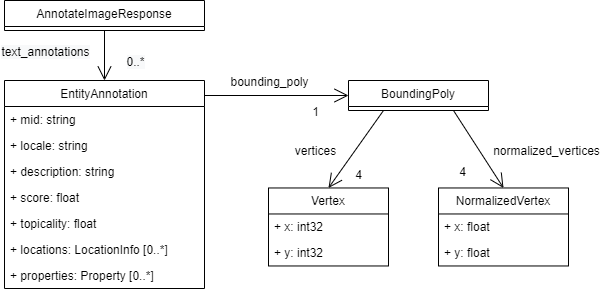
画像に対する抽出結果は、AnnotateImageResponseオブジェクトにまとめられています。textAnnotationsは、このAnnotateImageResponseのフィールドです。
textAnnotations(text_annotations)に関連するデータ構造を、公式リファレンス(https://cloud.google.com/vision/docs/reference/rpc/google.cloud.vision.v1?hl=ja#google.cloud.vision.v1.AnnotateImageResponse)をもとに図にしてみました。
※EntityAnnotationにはconfidenceフィールドもありますが、非推奨になっているため省略しています。
text_annotationsは、EntityAnnotation型のオブジェクトのリストになっています。
また、リファレンスを見ると、EntityAnnotation型は、OCR専用の型ではなく、
- landmark_annotations
- logo_annotations
- label_annotations
- text_annotations
で共用されています。
画像からランドマーク、ロゴ、ラベルを検出して注釈(annotation)をつけるのと同様に、画像から検出した単語(文字)を注釈(annotation)とする意図だと思います。
EntityAnnotationという1つの型で異なる注釈を扱うため、OCRでは利用しないフィールドも含んでいます。(特徴(機能)固有のフィールドを含んでいます。)
公式リファレンスには、OCRで各フィールドがどのように設定されるかを細かく書いていませんので、実験を通して確認することにします。
[4]具体的な例
まずは、どのような値が設定されるのかを確認するために、text_annotationsをリストして内容を表示する簡単なコードを用意します。
def sample_list_annotation(text_annotations):
  """text_annotationsの要素を表示する"""
  for i, ea in enumerate(text_annotations):
    print("[{}]={}/locale={}, bounding_poly={},m={},s={},t={},l={},p={}".format(
        i, ea.description, ea.locale, str_bounding_poly(ea.bounding_poly),
         ea.mid, ea.score, ea.topicality, ea.locations, ea.properties))

def str_bounding_poly(poly):
  """BoundingPolyの内容を文字列化する"""
  if poly.normalized_vertices:
    return 'N[' + ','.join([ "({},{})".format(v.x,v.y) for v in poly.normalized_vertices]) + ']'
  elif poly.vertices:
    return 'V[' + ','.join([ "({},{})".format(v.x,v.y) for v in poly.vertices]) + ']'
  else:
    return '[]'
また、textAnnotationsと同時に得られるfullTextAnnotationの内容と比較するため、以下のコードも用意しておきます。
def summary_full_text_annotation(full_text_annotation):
  """fullTextAnnotationのうちEntityAnnotationに該当する内容を表示する"""

  def str_langs(prop):
    """検出した言語を文字列化する"""
    if prop.detected_languages:
      return "[" + ','.join([ "({}/{})".format(
          ln.language_code,ln.confidence) for ln in prop.detected_languages]
          ) + "]"
    else:
      return ''

  def get_wordtext(word):
    """Wordオブジェクトのシンボルを連結したテキストを作成"""
    return "".join(symbol.text for symbol in word.symbols)

  print("-----text-----")
  print(full_text_annotation.text)
  print("--------------")
  for ipg, page in enumerate(full_text_annotation.pages):
    print("Page[{}] langs={}".format(ipg,str_langs(page.property)))
    for ib,block in enumerate(page.blocks):
      print("*Block[{}] bounding_box={}/langs={}".format(
          ib, str_bounding_poly(block.bounding_box), str_langs(block.property)))
      for ipar,paragraph in enumerate(block.paragraphs):
        print("  Paragraph[{}] bounding_box={}/langs={}".format(
            ipar,str_bounding_poly(paragraph.bounding_box), str_langs(paragraph.property)))
        for iw,word in enumerate(paragraph.words):
          print("   Word[{}]='{}' bounding_box={}/langs={}".format(
              iw, get_wordtext(word), str_bounding_poly(word.bounding_box), str_langs(word.property)))
(1)設定されるフィールドの確認
まずは、簡単なサンプルとして、『Vision API OCR事始め(1):TEXT_DETECTIONとDOCUMENT_TEXT_DETECTIONの違い/(1)スパースと思われる画像の例』で利用した画像(agent.jpg)を利用して、結果を確認してみます。
agent.jpgに対してテキスト検出します。
txt_agent_response = client.text_detection({'source':{'filename': 'agent.jpg' }})①textAnnotationsの内容
結果を表示してみます。
sample_list_annotation( txt_agent_response.text_annotations )実行結果
[0]=業務システム
入力
処理
人間
記憶装置
出力
/locale=ja, bounding_poly=V[(24,25),(471,25),(471,217),(24,217)],m=,s=0.0,t=0.0,l=[],p=[]
[1]=業務/locale=, bounding_poly=V[(289,25),(332,25),(332,47),(289,47)],m=,s=0.0,t=0.0,l=[],p=[]
[2]=システム/locale=, bounding_poly=V[(334,25),(397,25),(397,47),(334,47)],m=,s=0.0,t=0.0,l=[],p=[]
[3]=入力/locale=, bounding_poly=V[(230,103),(263,104),(263,120),(230,119)],m=,s=0.0,t=0.0,l=[],p=[]
[4]=処理/locale=, bounding_poly=V[(423,120),(458,120),(458,136),(423,136)],m=,s=0.0,t=0.0,l=[],p=[]
[5]=人間/locale=, bounding_poly=V[(24,183),(57,183),(57,199),(24,199)],m=,s=0.0,t=0.0,l=[],p=[]
[6]=記憶/locale=, bounding_poly=V[(410,187),(439,187),(439,201),(410,201)],m=,s=0.0,t=0.0,l=[],p=[]
[7]=装置/locale=, bounding_poly=V[(442,187),(471,187),(471,201),(442,201)],m=,s=0.0,t=0.0,l=[],p=[]
[8]=出力/locale=, bounding_poly=V[(230,201),(263,200),(263,216),(230,217)],m=,s=0.0,t=0.0,l=[],p=[]
参考として、bounding_polyの矩形を、先頭要素を赤、後続要素を緑で描画してみます。
これをみると、値が設定されているフィールドは、description、locale(先頭要素のみ)、bounding_poly.verticesの3つのフィールドのみのようです。
②fullTextAnnotationの内容
続いて、fullTextAnnotationの値と比較するため以下のコードを実行します。
summary_full_text_annotation( txt_agent_response.full_text_annotation )実行結果
-----text-----
業務システム
入力
処理
人間
記憶装置
出力

--------------
Page[0] langs=[(ja/0.33000001311302185)]
*Block[0] bounding_box=V[(289,25),(397,25),(397,47),(289,47)]/langs=[(ja/1.0)]
  Paragraph[0] bounding_box=V[(289,25),(397,25),(397,47),(289,47)]/langs=[(ja/1.0)]
   Word[0]='業務' bounding_box=V[(289,25),(332,25),(332,47),(289,47)]/langs=[(ja/0.0)]
   Word[1]='システム' bounding_box=V[(334,25),(397,25),(397,47),(334,47)]/langs=[(ja/0.0)]
*Block[1] bounding_box=V[(230,103),(263,104),(263,120),(230,119)]/langs=
  Paragraph[0] bounding_box=V[(230,103),(263,104),(263,120),(230,119)]/langs=
   Word[0]='入力' bounding_box=V[(230,103),(263,104),(263,120),(230,119)]/langs=
*Block[2] bounding_box=V[(423,120),(458,120),(458,136),(423,136)]/langs=
  Paragraph[0] bounding_box=V[(423,120),(458,120),(458,136),(423,136)]/langs=
   Word[0]='処理' bounding_box=V[(423,120),(458,120),(458,136),(423,136)]/langs=
*Block[3] bounding_box=V[(24,183),(57,183),(57,199),(24,199)]/langs=
  Paragraph[0] bounding_box=V[(24,183),(57,183),(57,199),(24,199)]/langs=
   Word[0]='人間' bounding_box=V[(24,183),(57,183),(57,199),(24,199)]/langs=
*Block[4] bounding_box=V[(410,187),(471,187),(471,201),(410,201)]/langs=
  Paragraph[0] bounding_box=V[(410,187),(471,187),(471,201),(410,201)]/langs=
   Word[0]='記憶' bounding_box=V[(410,187),(439,187),(439,201),(410,201)]/langs=
   Word[1]='装置' bounding_box=V[(442,187),(471,187),(471,201),(442,201)]/langs=
*Block[5] bounding_box=V[(230,201),(263,200),(263,216),(230,217)]/langs=
  Paragraph[0] bounding_box=V[(230,201),(263,200),(263,216),(230,217)]/langs=
   Word[0]='出力' bounding_box=V[(230,201),(263,200),(263,216),(230,217)]/langs=
③考察
textAnnotationsとfullTextAnnotationの結果を比較して考えると、以下のことがいえそうです。
- text_annotationsの先頭要素のEntityAnnotationオブジェクトには画像全体のテキスト情報が入ります。そして、後続のEntityAnnotationオブジェクトには、fullTextAnnotationのWordの情報が入っているように思えます。
- 先頭要素のdescriptionフィールドには、画像から抽出されたテキスト全体が格納されており、これは、fullTextAnnotation.textと同じ値になっているようです。
- 後続要素のdescriptionフィールドに、単語レベルのテキストが格納されており、fullTextAnnotationのWordと同じテキストになっているようです。
- 後続要素のbounding_polyの値は、fullTextAnnotationのWordのbounding_boxと同じようです。
- 全てのbounding_poly(BoundingPoly型)の値は、verticesフィールドが利用されます。
- 先頭要素のlocaleフィールドには、fullTextAnnotationのPageのDetectedLanguageのコードが入るようです。後続要素のlocaleフィールドには値が設定されないように見えます。
(2)localeの確認
先の例で先頭要素のlocaleに値が設定されるようですが、複数言語を認識している場合はどのように扱われるのか見てみます。
ここでは『Vision API OCR事始め(2):検出されたテキストの階層構造(fullTextAnnotation)/(1)DetectedLanguage』で利用した以下の画像(hello.png)で試してみます。
hello.pngに対してTEXT_ANNOTATIONでテキスト検出します。
txt_hello_response = client.text_detection({'source':{'filename': 'hello.png'}})①textAnnotationsの内容
結果を表示してみます。
sample_list_annotation(txt_hello_response.text_annotations)実行結果
[0]=こんにちは
Hello
Здравствуйте
Bonjour
/locale=ru, bounding_poly=V[(8,19),(300,19),(300,80),(8,80)],m=,s=0.0,t=0.0,l=[],p=[]
[1]=こんにちは/locale=, bounding_poly=V[(9,19),(111,19),(111,36),(9,36)],m=,s=0.0,t=0.0,l=[],p=[]
[2]=Hello/locale=, bounding_poly=V[(212,19),(264,19),(264,35),(212,35)],m=,s=0.0,t=0.0,l=[],p=[]
[3]=Здравствуйте/locale=, bounding_poly=V[(8,61),(161,61),(161,80),(8,80)],m=,s=0.0,t=0.0,l=[],p=[]
[4]=Bonjour/locale=, bounding_poly=V[(214,60),(300,60),(300,80),(214,80)],m=,s=0.0,t=0.0,l=[],p=[]
先頭要素のlocaleにはru(ロシア語)のみ設定されています。
②fullTextAnnotationの内容
続いて、fullTextAnnotationの値と比較するため以下のコードを実行します。
summary_full_text_annotation( txt_hello_response.full_text_annotation )実行結果
-----text-----
こんにちは
Hello
Здравствуйте
Bonjour

--------------
Page[0] langs=[(ru/0.4099999964237213),(fr/0.23999999463558197),(en/0.17000000178813934),(ja/0.17000000178813934)]
*Block[0] bounding_box=V[(9,19),(111,19),(111,36),(9,36)]/langs=[(ja/1.0)]
  Paragraph[0] bounding_box=V[(9,19),(111,19),(111,36),(9,36)]/langs=[(ja/1.0)]
   Word[0]='こんにちは' bounding_box=V[(9,19),(111,19),(111,36),(9,36)]/langs=[(ja/0.0)]
*Block[1] bounding_box=V[(212,19),(264,19),(264,35),(212,35)]/langs=[(en/1.0)]
  Paragraph[0] bounding_box=V[(212,19),(264,19),(264,35),(212,35)]/langs=[(en/1.0)]
   Word[0]='Hello' bounding_box=V[(212,19),(264,19),(264,35),(212,35)]/langs=[(en/0.0)]
*Block[2] bounding_box=V[(8,61),(161,61),(161,80),(8,80)]/langs=[(ru/1.0)]
  Paragraph[0] bounding_box=V[(8,61),(161,61),(161,80),(8,80)]/langs=[(ru/1.0)]
   Word[0]='Здравствуйте' bounding_box=V[(8,61),(161,61),(161,80),(8,80)]/langs=[(ru/0.0)]
*Block[3] bounding_box=V[(214,60),(300,60),(300,80),(214,80)]/langs=[(fr/1.0)]
  Paragraph[0] bounding_box=V[(214,60),(300,60),(300,80),(214,80)]/langs=[(fr/1.0)]
   Word[0]='Bonjour' bounding_box=V[(214,60),(300,60),(300,80),(214,80)]/langs=[(fr/0.0)]
Pageのdetected_languagesの値は、[(ru/0.4099999964237213),(fr/0.23999999463558197),(en/0.17000000178813934),(ja/0.17000000178813934)]です。
つまり、ru,fr,en,jaの4つの言語を認識しており、confidence値が最も高いruが先頭要素になっています。
③考察
textAnnotationsとfullTextAnnotationの結果を比較して考えると、以下のことがいえそうです。
- text_annotationsの先頭要素のlocaleには、fullTextAnnotation.pages[0].property.detected_languages[0].language_codeの値(ページのconfidence値が最も高い言語コード)がlocaleに設定されるようです。
- この例においても後続要素のlocaleには値が設定されないようです。
(3)画像テキスト全体の領域
各単語の領域(bounding_poly)は、fullTextAnnotationのWordのbounding_boxの値と一致しているようですが、text_annotationsの先頭要素(画像全体のテキスト:fullTextAnnotation.text)に対応する矩形情報はfullTextAnnotationにありません。
(1)と(2)の例を考えると、全てのWordの領域を囲む最小の矩形のように見えますが、傾いた画像などで試してみることにします。
①例:naname1.jpg
実行結果
[0]=テクノ大福帳
Vision API
Blog
/locale=en, bounding_poly=V[(15,33),(181,33),(181,128),(15,128)],m=,s=0.0,t=0.0,l=[],p=[]
[1]=テクノ/locale=, bounding_poly=V[(15,85),(65,63),(73,80),(23,102)],m=,s=0.0,t=0.0,l=[],p=[]
[2]=大福帳/locale=, bounding_poly=V[(68,60),(129,33),(138,52),(76,79)],m=,s=0.0,t=0.0,l=[],p=[]
[3]=Vision/locale=, bounding_poly=V[(27,112),(82,88),(89,103),(34,128)],m=,s=0.0,t=0.0,l=[],p=[]
[4]=API/locale=, bounding_poly=V[(90,85),(123,71),(130,87),(97,101)],m=,s=0.0,t=0.0,l=[],p=[]
[5]=Blog/locale=, bounding_poly=V[(143,77),(176,67),(181,81),(147,91)],m=,s=0.0,t=0.0,l=[],p=[]
②例:naname2.png
実行結果
[0]=テクノ大福帳
Vision API
Blog
/locale=en, bounding_poly=V[(24,15),(163,15),(163,141),(24,141)],m=,s=0.0,t=0.0,l=[],p=[]
[1]=テクノ/locale=, bounding_poly=V[(48,15),(96,40),(87,58),(39,33)],m=,s=0.0,t=0.0,l=[],p=[]
[2]=大福帳/locale=, bounding_poly=V[(99,41),(159,72),(150,91),(89,60)],m=,s=0.0,t=0.0,l=[],p=[]
[3]=Vision/locale=, bounding_poly=V[(33,42),(88,70),(80,86),(25,58)],m=,s=0.0,t=0.0,l=[],p=[]
[4]=API/locale=, bounding_poly=V[(96,73),(128,89),(120,106),(87,90)],m=,s=0.0,t=0.0,l=[],p=[]
[5]=Blog/locale=, bounding_poly=V[(134,109),(163,126),(155,140),(126,123)],m=,s=0.0,t=0.0,l=[],p=[]
③考察
これまでの例から考えると、先頭要素のbounding_polyの矩形は、後続要素のbounding_polyに対する「Axis-aligned minimum bounding box」だと思います。ただ、上記の傾いた画像の例だと、後続要素のx,y座標の最小、最大値と少し異なる値もあるので、正確な計算方法はわかりませんでした。
(参考)
上記の例で、傾いたテキストを認識できていることが分かります。参考までに、別の画像を試した例も載せておきます。
反転したテキストを含む画像も正しく文字が認識されました。
(元画像)
(結果)
交差しているテキストでも、文字は正しく認識されました。
(元画像)
(結果)
正直、凄いと思いましたが、実際には結果の解釈はなかなか難しいものがあります。
文字の方向や矩形に関する話題は、また別の記事で書きたいと思います。
(4)画像全体のテキスト
textAnnotationsの先頭要素のdescriptinのテキスト内容が、fullTextAnnotation.textと一致しているようですが、これまでの例が、たまたま一致しているのか、それともfullTextAnnotation.textの内容がコピーされているのかを考えてみます。
textAnnotationsの先頭要素のテキストは、後続要素のテキストを単純に並べたものではありません。例えば(1)の例では、単語レベルでは「業務」と「システム」に分割されていますが、先頭要素では「業務システム」となっています。「記憶装置」も同様です。
さらに次の例(blogtext.jpg)を見てみます。
詳細な結果は長くなるので省略しますが、先頭要素のテキストは以下のようになります。
[1] はじめに
私にはA技術の深い専門的知識はありません。しかし、長年業務システムの設計や開発に携わってき
たこともあり、Al技術そのものよりも、Al技術を応用して業務システムを少し賢くする、という観点
から、A技術に注目しています。 大企業の業務システムや大規模パッケージは別として、中小規模の
業務システムやパッケージに携わっている方は、 同じような興味を持たれているかもしれません。
そこで、今回は業務システムのデータ入力をとっかかりとして、「便利」というより 「少し賢い」こ
とを目指した業務システムについて考えていることを書いてみます。 結論は当たり前の話ですが、そ
う考えた過程に参考になる部分があれば幸いです。
これはfullTextAnnotation.textの値と同じなのですが、結果テキストに半角空白が入っているところがあります。改行位置を考えてみても、fullTextAnnotationのDetectedBreakの情報が反映されていると思います。これらを考えると、後続要素のWord情報から先頭要素のテキストを作っているのではなく、fullTextAnnotation.textの値がコピーされているように思えます。
[5]fullTextAnnotationとの対応関係の確認
これまでの例を考えると、textAnnotationsの内容は、fullTextAnnotationの内容を元に作成されているものと思えました。(textAnnotationsの先頭要素のbunding_polyを除く)
これを確かめるために、以下の簡単なテストコードを用意しました。
def test_text_annotations_and_full_text(response):
  if len(response.text_annotations) < 1:
    print("text_annotationsの要素がありません")
  else:
    # fullTextAnnotation.textとtextAnnotations[0]のテキスト要素が同じかどうかのテスト
    if response.full_text_annotation.text == response.text_annotations[0].description:
      print("〇:fullTextAnnotation.textとtextAnnotations[0]は同じテキスト")
    else:
      print("×:fullTextAnnotation.textとtextAnnotations[0]は異なるテキスト")

    # fullTextAnnotationのPageのDetectedLanguages[0]とtextAnnotations[0]のlocaleの比較
    l_ent = response.text_annotations[0].locale
    l_page = response.full_text_annotation.pages[0].property.detected_languages[0].language_code
    if l_ent == l_page:
      print("〇:textAnnotations[0].localeはfullTextAnnotationのPageのDetectedLanguageの先頭言語コードと同じ")
    else:
      print("textAnnotations[0].localeはfullTextAnnotationのPageのDetectedLanguageの先頭言語コードと異なる")


    # 単語レベルのEntityAnnotationのリスト
    entity_list = get_entity_from_text_annotations(response.text_annotations)
    # fullTextAnnotation内の全てのWord要素のリスト
    word_list = get_words_from_full_text_annotation(response.full_text_annotation)

    # 単語内容の比較
    w_ent = [ent.description for ent in entity_list]
    w_word = [get_wordtext(wd) for wd in word_list]
    if w_ent == w_word:
      print("〇:抽出された単語とその並びは同じ")

      # さらに単語領域の比較
      b_ent = [ent.bounding_poly for ent in entity_list]
      b_word = [wd.bounding_box for wd in word_list]
      if b_ent == b_word:
        print(" 〇:単語領域も同じ")
      else:
        print(" ×:単語領域が異なる")
        print("  text_annotations    ={}".format(b_ent))
        print("  full_text_annotation={}".format(b_word))

    else:
      print("×:抽出された単語が異なる")
      print("  text_annotations    ={}".format(w_ent))
      print("  full_text_annotation={}".format(w_word))

def get_entity_from_text_annotations(text_annotations):
  """text_annotationsから、先頭をスキップしてEntityAnnotationのリストを作成"""
  # 先頭はスキップ
  return [ text_annotations[i]  for i in range(1,len(text_annotations))]

def get_words_from_full_text_annotation(full_text_annotation):
  """full_text_annotationから全ページのWordオブジェクトのリストを作成"""
  return [wd for page in full_text_annotation.pages
              for block in page.blocks
                for par in block.paragraphs
                  for wd in par.words ]

def get_wordtext(word):
  """Wordオブジェクトのシンボルを連結したテキストを作成"""
  return "".join(symbol.text for symbol in word.symbols)
このテストコードを、例えば(2)のhello.pngの結果(txt_hello_response)で試してみます。
test_text_annotations_and_full_text(txt_hello_response)結果は以下のようになりました。
〇:fullTextAnnotation.textとtextAnnotations[0]は同じテキスト
〇:textAnnotations[0].localeはfullTextAnnotationのPageのDetectedLanguageの先頭言語コードと同じ
〇:抽出された単語とその並びは同じ
 〇:単語領域も同じ
その他、本ブログの例について試した範囲では、同じ結果になるようです。
[6]textAnnotationsの内容のまとめ
簡単な実験だけでしたが、textAnnotationsで得られる情報をまとめてみます。
(1)AnnotateImageResponse.text_annotationsフィールド
画像から検出した単語(形態素?)は、EntityAnnotation型のオブジェクトに格納され、AnnotateImageResponseのtext_annotationsのリストに格納されます。
大雑把に図にすると以下のような感じです。
ここで、もし、テキストを検出できなかった場合は、text_annotationsの要素は0です。
もし、N個の単語(形態素?)を検出した時は、先頭に画像全体のテキストを格納したEntityAnnotation型のオブジェクトが格納され、続いてN個の単語(形態素?)毎のEntityAnnotation型のオブジェクトが続きます。
結果として、N語の単語を検出した場合は、text_annotationsにはN+1個のEntityAnnotationオブジェクトが格納されています。
(2)先頭要素のEntityAnnotation型オブジェクト
先頭要素のEntityAnnotation型オブジェクトは、画像全体のテキストに関する情報が格納されます。
- descriptionフィールド
- 画像全体のテキストが入るようです。これはfullTextAnnotation.textと同じ値のようです。
- localeフィールド
- TextAnnotation.pages[0]のconfidence値が最も高い言語コードが設定されるようです。
- bounding_polyフィールド
- text_annotationsは画像に対してのみ設定されるようですので、単位はピクセルです。このため、矩形情報はBoundingPoly.verticesフィールド(整数値)に設定されます。
- 後続要素のbounding_polyを囲む矩形が設定されるようです。(「Axis-aligned minimum bounding box」と思われます。)
- mid、score、topicality、locations、propertiesフィールド
- 設定されないようです。
(3)後続要素のEntityAnnotation型オブジェクト
先頭要素以外のEntityAnnotation型オブジェクトは、単語(形態素?)レベルのテキストに関する情報が格納されます。
- descriptionフィールド
- 単語(形態素?)レベルのテキストが入るようです。これはfullTextAnnotationのWord下のSymbolを集めた文字列のようです。
- localeフィールド
- 後続要素には設定されないようです。
- bounding_polyフィールド
- 単位はピクセルで、矩形情報はBoundingPoly.verticesフィールド(整数値)に設定されます。
- fullTextAnnotationのWordのbounding_boxと同じ値のようです。
- mid、score、topicality、locations、propertiesフィールド
- 設定されないようです。
(参考)EntityAnnotation.midフィールド
TextAnnotationにはなくて、EntityAnnotationにあるフィールドの一つに、midがあります。
これは、公式リファレンスで「Opaque entity ID. Some IDs may be available in Google Knowledge Graph Search API.」と説明されています。
Knowledge Graph とは、Googleで検索した時に、右側に写真や説明などが表示されることがありますが、その元になっている情報です。
公式ドキュメントにあるランドマーク検出、ロゴ検出、ラベル検出のサンプルを試すと、midが設定されます。そして、そのmidでGoogle Knowledge Graph Search APIを利用して情報を得ることが出来ます。
しかし、(いろいろ試してみたのですが)残念ながらOCRではmidが設定されないようです。
Knowledge Graph、セマンティックウェブなどの話題については、別の記事で書きたいと思います。
(追記)
以下の関連記事を書きました。宜しければ参考にしてください。
[7]fullTextAnnotationとの使い分け
ここまで調べてみると、textAnnotationsは、fullTextAnnotationのサブセットということのようです。では、textAnnotationsは不要なのでしょうか?
文章を抽出したいときはfullTextAnnotationのようなテキストの階層構造をもったデータの方がよいのは確かですが、例(1)のようなスパースな画像から単語レベルを抽出したいだけ、という用途の場合は、むしろtextAnnotationsのほうが簡単ではあります。
Googleの公式ドキュメントのサンプルにおいても、以下のように使い分けています。
- 画像内のテキストを検出する(https://cloud.google.com/vision/docs/ocr?hl=ja)
- サンプルは、看板?の画像からテキストを抽出します。
- TEXT_DETECTIONで、textAnnotationsの内容を表示します。
- ファイル内のテキストを検出する(PDF / TIFF)(https://cloud.google.com/vision/docs/pdf?hl=ja)
- サンプルは、PDF文書ファイルからテキストを抽出します。
- DOCUMENT_TEXT_DETECTIONで、fullTextAnnotationの内容を表示しています。
とはいうものの、表形式データのように、どっちつかずのデータもあるので、なかなか難しいところです。
結局のところは、単語と座標が得られれば十分、あるいは、文書全体のテキストが得られれば十分ということであれば、textAnnotationsで事足ります。それ以外は、fullTextAnnotationの情報へアクセスする必要があるということかと思います。(当たり前の結論ですみません。)


コメント
コメントを投稿